Understanding Audio Requirements
November 25, 2025
Audio Standards for Audiobook Recording
The Ultimate Audiobook Requirements Guide (With How-To Audiobook Recording Videos)
If you’re getting ready to record an audiobook, stop now and make sure that you understand audio requirements first. Audiobook distribution platforms, from Audible to Amazon to iTunes, each have their own unique set of audio standards that you must follow to be approved. Maximize your audiobook distribution potential by taking the time to ensure your recording follows all of the outlined audiobook requirements. In this guide, we’ll help you understand all of the technical jargon of audiobook submission requirements, so you can feel confident when you upload your audio files for approval.
Audio File Requirements
While each distribution platform has its own audiobook guidelines, we’ve compiled a list of the essential audio requirements you need to know to get approved by our audiobook distribution partners. We’ll review each in detail below.
Audio Requirements At A Glance
- Be consistent in the overall sound and formatting of all files
- Use either mono or stereo for all files
- Maintain the same bit rate for all files
- Include opening and closing credits (in separate audio tracks)
- Include a sample track between 1-5 minutes in length
- Contain only one chapter or section per audio file
- Be no longer than 119 minutes each
- Contain a section or chapter announcement at the beginning of the audio file
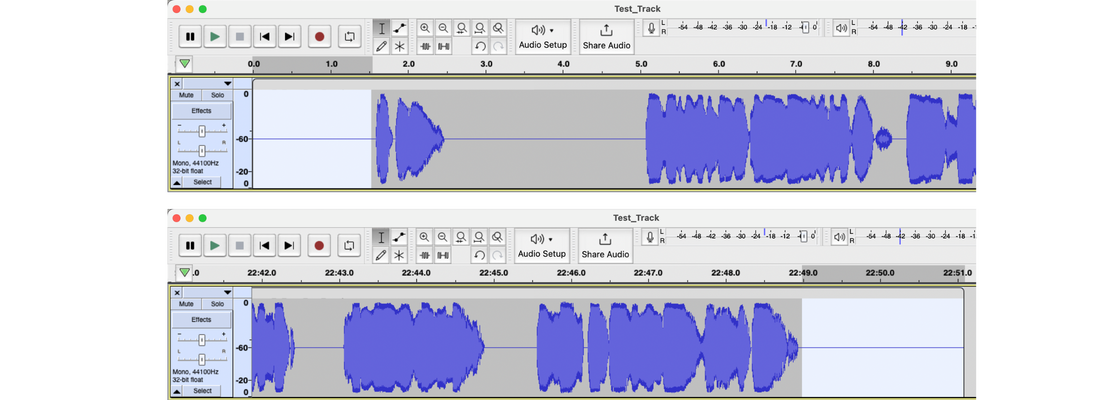
- Contain 1 to 5 seconds of silence at the beginning and end of each track
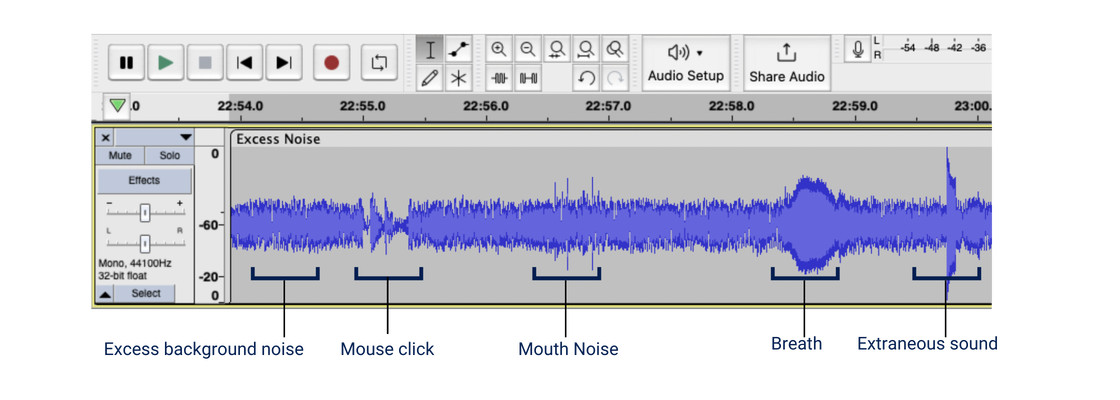
- Be free of extraneous sounds such as plosives, mic pops, mouse clicks, excessive mouth noise, and outtakes
- Measure between -23dB and -18dB RMS
- Have peak values no higher than -3dB
- Have a noise floor no higher than -60dB RMS
- 192 kbps or higher
- MP3 file format
- Constant Bit Rate (CBR)
- 44.1 kHz
- No larger than 170 MB
1. Consistency in overall sound and formatting
Consistency in the sound and formatting of your audiobook creates a polished finished product. Tracks should maintain a consistent volume level (dB) and quality for a smooth listening experience. The listener shouldn’t be able to hear when you stopped recording one day and picked it up the next day.
Tips for consistent audio files:
- Sit the same distance away from the microphone, in the same environment, every time you record.
- Use the same editing techniques throughout your audiobook recording. This includes adjusting peak levels with a limiter and editing out extra noises, including clicks, breaths, and other distractions.
- Ensure there is no background noise when you are recording.
- Use the same introduction format for each chapter track.
- Keep a reference file outlining the tone, character voices, and pronunciation details.
2. Mono or Stereo Files
All tracks must be either all mono or all stereo files— stick to one or the other. So, what’s the difference and which should you choose?
- Mono files: These include all of the sound contained within one audio channel, ensuring that each speaker provides the same output evenly. For voice-only audiobook recordings, this is the preferred format for most audiobook distributors.
- Stereo files: These are split into two audio channels so that different sounds are sent to the left and right speakers, achieving a more natural sound experience. If you’re recording a dramatized audiobook, which typically includes music and sound effects, stereo can enhance the listener's experience.
3. Include opening track and closing credits track
Opening Credits Track (Maximum 2 minutes): The opening credits track should, at minimum, include the book title, author, and narrator, which must all match the information listed on the cover art and in the metadata exactly.
Example: Your opening credits track announces that the author's name is John Doe, but the cover art and metadata state the author's name is John Oliver Doe, you'll have to make an adjustment.
Example Script
This is The Dog Crossed The Road
Written by John Doe
Narrated by Jane Doe
Closing Credits Track (Maximum 2 minutes): The closing track should include the title, author, and narrator. You may include additional credits as long as the recording is under 2 minutes.
Example Script
You have been listening to The Dog Crossed The Road
Written by John Doe
Narrated by Jane Doe
Editing and Mastering by Amelia Doe
Cover Art by Elle Doe
Thank you for listening/The End!
Note: Any dedications or acknowledgements should be announced in a separate chapter track.
4. Include a sample track 1-5 minutes in length
Sample tracks are essential for audiobook marketing and promotion. Draw listeners in by selecting a part of your audiobook that provides readers with an understanding of the plot, tone, and narrator's voice without spoiling any significant story elements.
5. Each track must only contain one chapter or section
This simply means that you need to upload your opening credits track, closing credits track, sample track, and each chapter track as an individual MP3. You will likely have a lot of files, but this step is helpful for allowing listeners to easily navigate the chapters of your audiobook.
6. Each track must be no longer than 119 minutes
Another straightforward one: audiobook files can’t exceed 119 minutes. If your chapters are too long and you need to split them up find a natural space to pause and add a chapter announcement (eg. Chapter 17 continued).
7. Each track must contain a section or chapter announcement at the beginning of the audio file
The narrator must announce the name of each section or chapter exactly how it is written in your manuscript (Ex. Prologue, Chapter 1, Section 1, etc.). This is helpful for listeners to easily know what chapter they are on.
8. Each track must contain 1 to 5 seconds of silence at the beginning and end
Silence and room tone are two different things. Room tone is the ambient noise of the room you’re recording in. Silence is nothingness. At the beginning and end of each track, include 1 to 5 seconds of silence. For help with this, check out our step-by-step guide for front and rear spacing or our YouTube tutorials for adding silence.
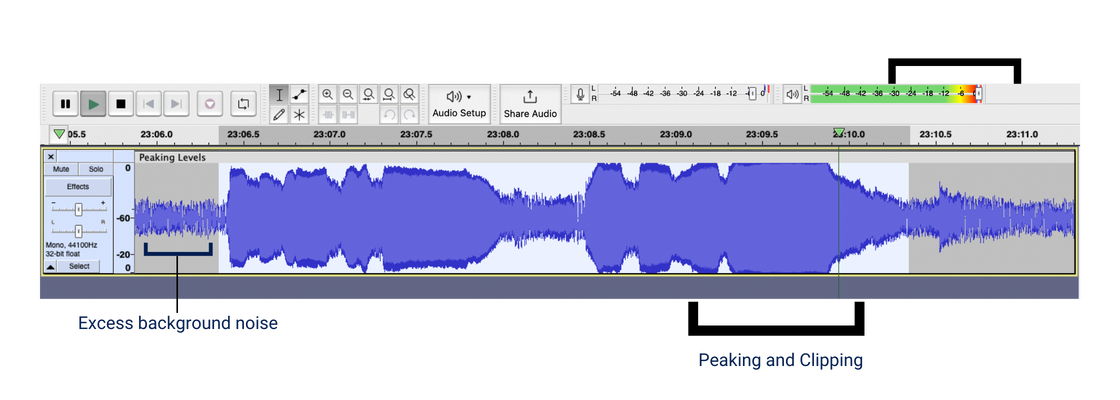
9. Eliminate any extraneous sounds such as plosives, mic pops, mouse clicks, excessive mouth noise, and outtakes
This is where your recording environment is key. Ensuring that you record in an isolated space with no background noise will help tremendously here, saving you time removing extraneous sounds when editing.
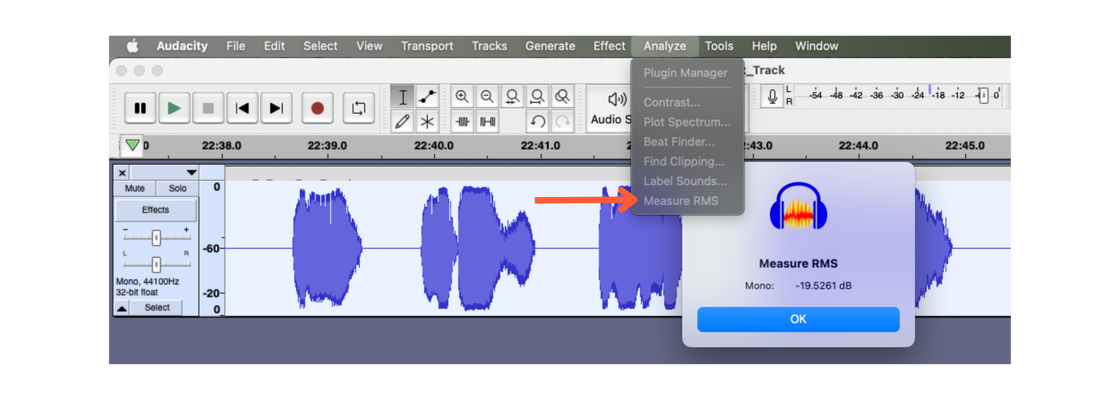
10. Each track must measure between -23dB and -18dB RMS
RMS stands for Root Mean Square. Keeping your RMS between -23dB and -18dB ensures your audio isn’t too loud or too quiet. Get help fixing incorrect RMS levels here, or watch our YouTube tutorial on adjusting RMS levels for help.
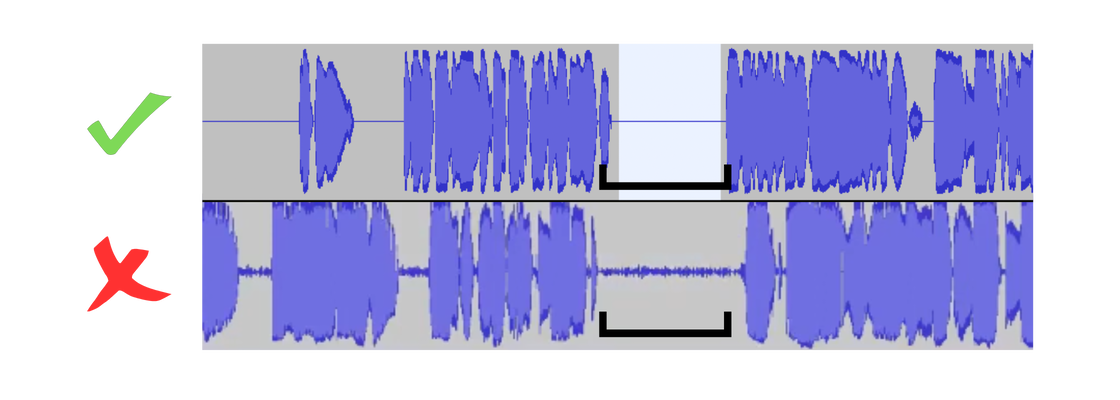
11. Each track must have a noise floor no higher than -60dB RMS
Noise floor is a measurement of how loud your room tone is (the white noise of your recording space). If you stood perfectly still in your recording space and hit record, how much noise would be picked up by the microphone? If you’re recording and you hear the rumbling of a garbage truck, wait until it has made its rounds and start again. This audio requirement helps prevent listeners from having to constantly adjust their volume settings. Check out our YouTube tutorial on noise reduction for help.
12. Each track must have peak values no higher than -3dB
If your track is peaking above -3dB (decibel), the audio can sound distorted, like the signal is breaking up.
When the audio peaks past the maximum allowable limit, it clips off the top of the sound wave, decreasing the audio quality. To avoid peaking, run a noise reduction with a maximum peak value of -6dB.
Watch the levels rise and drop as you speak into the microphone. It can be a lot to pay attention to all at once, but it's best to catch it while recording rather than fixing it in the editing phase. Get help from our Peaking at Zero DB YouTube video tutorial.
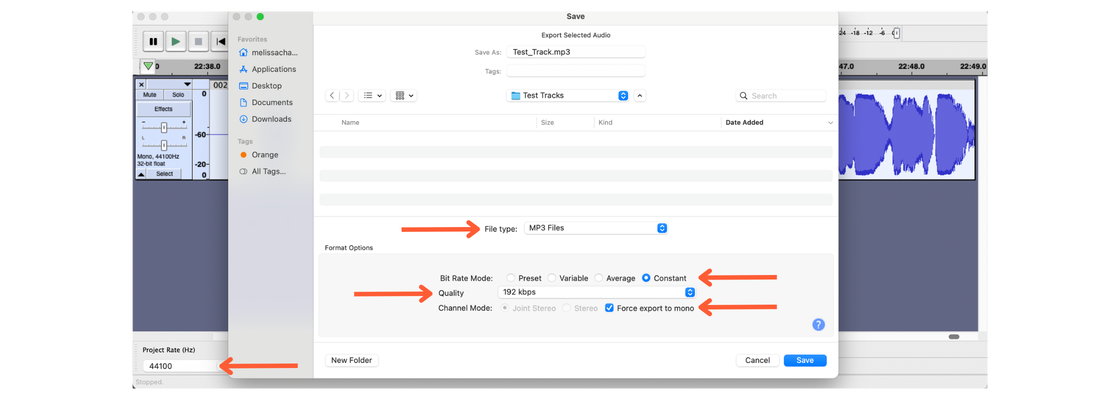
13. Each track must be 192 kbps (Export Setting)
This refers to the average amount of data per second for data transferring. As the kbps (kilobits per second) increases, it gets closer to the original quality, but the file size also increases at the same time. 192 kbps ensures a small file size without decreasing audio quality.
14. Each track must be in MP3 file format (Export Setting)
Export each file as an MP3.
15. Constant Bit Rate (CBR) (Export Setting)
To avoid any quality drops throughout your track, choose ‘constant bit rate’ (CBR) when exporting your track. This maintains a consistent bit rate (192 kbps) throughout the track, rather than fluctuating it up and down.
16. Sample Rate of 44.1 kHz (Recording Setting)
This is the sample rate (the number of samples per second taken from a continuous signal) that you record at. Depending on the audio software you’re using, this will be a setting you can choose before you record. If you’re using Audacity, you’ll see this selection in the bottom left corner (also denoted as 44,100 Hz). This sample rate helps keep the file size small without decreasing audio quality.
17. Each file should be no larger than 170MB
If your track follows all of the outlined audiobook requirements, your file will be no larger than 170MB.
When you’re ready to export your audiobook recording, this is what your settings should look like:
Follow our step-by-step audio export instructions for help.
How to Ensure Your Audiobook Recording Meets All Requirements
Whew! You’ve finished reviewing all of the required audio standards and have completed your audiobook recording. Give yourself some peace of mind by running an Audio Track Validation Report to ensure your files meet all of the necessary audio requirements.
For additional help, check out our YouTube channel, where we walk you through how to meet audio requirements.
Final Thoughts on Audiobook Recording Requirements
While audiobook recording is unfortunately not as simple as just narrating into a microphone, by following the above audiobook guidelines, you’ll be in great shape to have your audiobook accepted by the major distributors. Be sure to always review your audio files before submitting. Reviewing them more than once is even better, and having a second set of ears listen to the audiobook recordings will help ensure everything is approval-ready.
Editor’s Note: This post was originally written on August 24, 2021. It has been substantially revised as of November 25, 2025.