Self-Narration Guide
October 23, 2025
How to Record Your Own Audiobook
DIY Audiobook Recording: How to Record an Audiobook at Home
Interested in a do-it-yourself approach to audiobook production? With this step-by-step guide, learn how to narrate and record your own audiobook from home, no audio engineering experience required. We share our best advice on narrating your own audiobooks, setting up your recording space, and achieving top-quality audio.
1. Prepare Your Manuscript
Before recording your audiobook, you’ll need to rework your book into a narration-ready script.
- Review your document one line at a time and annotate places for natural pauses and breaths with a forward slash / and underline words or syllables that require emphasis.
- If you plan on using alternative voices for different characters, you may want to highlight or color-code all quoted speech.
- Convert charts, graphs, and visuals to audio or refer listeners to visit your website.
- Create a script for your audiobook’s opening and closing tracks. These credits must include the book title, author, and narrator, which must match the information listed on the cover art and in the metadata exactly.
- Opening Credits Script Template: “This is {Project Title}, Written by {Author Name}, Read for you by {Narrator Name}."
- Closing Credits Script Template: “You have been listening to {Project Title}. Written by {Author Name}, and read for you by {Narrator Name}. Published by {Publishing Company}. Cover art by {Artist's Name}. Copyright {Year}."
- Opening Credits Script Template: “This is {Project Title}, Written by {Author Name}, Read for you by {Narrator Name}."
2. Set Up Your Recording Space
If you don't have access to a soundproof space, you’ll need a quiet, sound-treated area to record in. Here are some tips for setting up one at home:
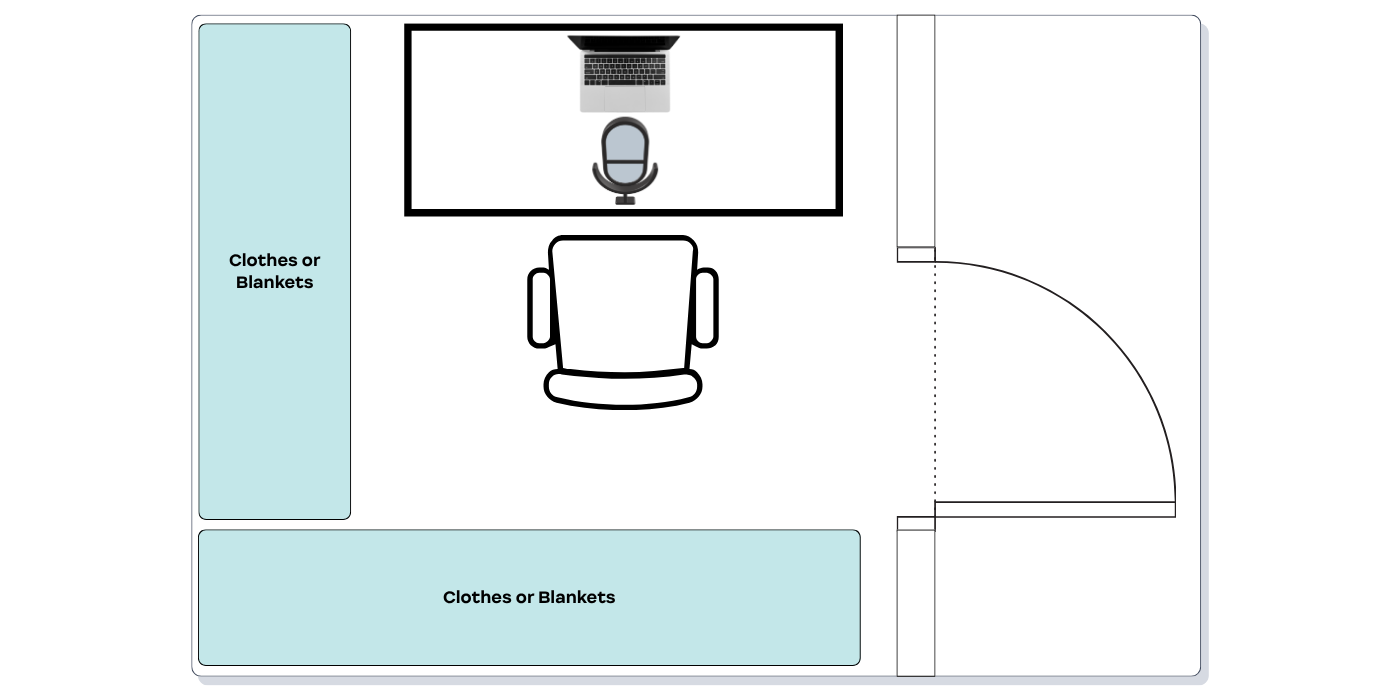
- Record in a carpeted room with all curtains pulled shut to reduce the amount of hard reflective surfaces for sounds to bounce off of, allowing for a more direct signal to the microphone. Padding the walls with blankets, cushions, or foam can also help dampen the sound.
- Avoid recording in spaces with fluorescent lights, air conditioner or heater units, or noisy computers. An ideal recording space setup is shown below.
- Record at a time of day when there is the least background noise interference in your space (neighbors, kids, appliances, etc.).
- Test out your hardware to see if you meet audio requirements before recording your entire title.
3. Get the Proper Equipment
Having the right equipment, including both hardware and software, is crucial for success in DIY audiobook recording. While it may seem overwhelming at first, reviewing the recommended tools below and making sure you know how to use them before you hit “record” is critical to ensuring quality sound and narration for your audiobook.
Audiobook Recording Hardware
Must Haves:
- Laptop or computer
- Quality USB microphone (we suggest the BlueSnowball or the Blue Yeti)
Nice-to-Haves:
- A pop filter, which helps to soften or eliminate 'popping' sounds (known as plosives) caused by fast-moving air hitting the microphone
- A microphone stand or boom arm
- Headphones that can plug into the audio jack on your microphone or computer
Audio Recording Software
We recommend Audacity, the most popular free audio editing software package, though there are a variety of other recording software options available, including:
- Ableton Live
- Adobe Audition
- Audacity
- Avid Pro Tools
- Cubase
- FL Studio
- GarageBand
- Logic Pro
- Magix Acid
- Magix Sound Forge
- Reaper
- Studio One
- TwistedWave
- WavePad
4. Record Your Audiobook
As you prepare to narrate your own audiobook, review these tips from seasoned pros to ensure the best possible recording experience.
- Record at least 10 seconds of room tone before you begin to narrate (room tone is the ambient background noise of your space). Try to stay as silent as possible during this time - avoid rustling around or breathing heavily.
- When you start reading your script, be sure to take your time and read slowly and distinctly to ensure clarity and ease of understanding.
- If you make a mistake, don’t worry! Simply pause and let the recording continue in silence for at least five seconds before returning to the previous sentence and starting over.
- Create separate tracks for each chapter, as well as for the opening and closing credits. This will help make the editing process smoother and more efficient. (In Audacity: Tracks>Add New>Mono track)
- At the end of each recording session, it’s wise to export a WAV file of the entire recording, and save it on a different device.
- Keep the mic at a distance of approximately 6–8 inches from your face. Come in closer when you need to whisper, and make sure to pull back (and even turn your head away from the mic slightly) when you’re raising your voice to a scream or shout.
- Try to avoid breathing loudly, smacking your lips, clicking your tongue, and any other similar distracting noises. Staying well-hydrated helps minimize these unwanted mouth noises.
- Keep characters, voices, and accents consistent throughout your recording.
- Avoid the following to prevent background noise while you are recording:
- Adjusting headphones
- Turning pages
- Typing
- Mouse clicking
- Headphone cords brushing against clothes
- Wearing dangling jewelry or loud clothing
- Adjusting microphone position / holding microphone in your hand
5. Edit & Master Your Audio Files
This is the step where you’ll take care of editing, noise removal, and volume adjustments. Return to the beginning of your recording and start listening.
Note: This section on recording and post-production assumes you’ll be using Audacity, but the key takeaways apply to any recording software.
- Deleting Errors
- In Audacity: Once you arrive at an error, you can highlight the mistake, press ‘z’ on your keyboard to ensure a smooth cut, and press the ‘Delete’ key on your keyboard to erase this section. You may need to adjust the spacing to ensure the new sentence begins smoothly. For efficiency, review all Audacity keyboard shortcuts before you get started.
- Noise Removal
- Unless you’ve been able to soundproof your studio, there will be ambient noise—which is why it’s helpful to record at least ten seconds of room tone at the beginning.
- In Audacity: Using your mouse, highlight those ten seconds. Select Effect>Noise Removal and Repair>Noise Reduction, then click ‘Get Noise Profile’. Next, press Ctrl-A to select the entire recording and navigate to Effect>Noise Removal and Repair>Noise Reduction again. Click ‘OK’ to remove the ambient background noise from your recording. Watch a tutorial here.
- Volume Adjustment
- In Audacity: Press Ctrl-A to select the entire recording. From the menu, select Effect>Amplify, change the New Peak Amplitude (dB) to -6.0, then click ‘OK’. Watch a tutorial here.
- Adding Music
- If you want to include a brief music stinger in your opening credits, some services (like ccMixter or Free Music Archive) provide royalty-free music for commercial use (provided you give credit to the creator—typically voiced at the end of your production).
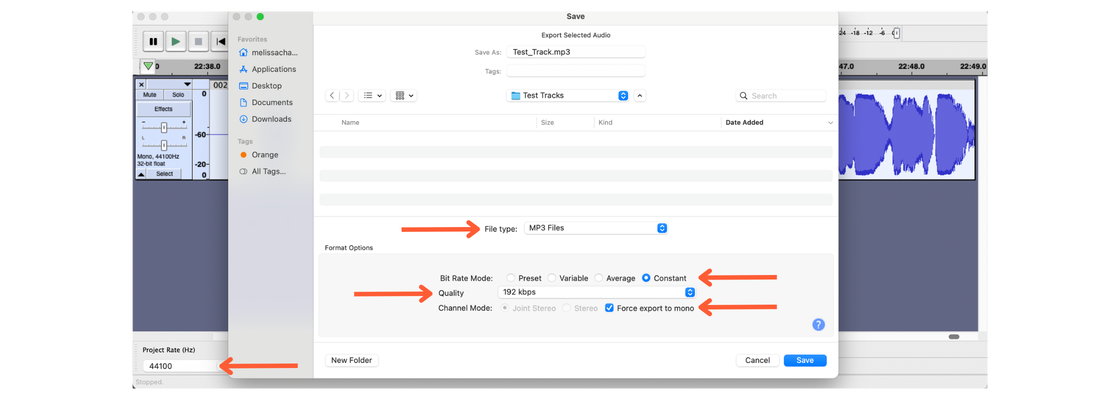
- Export Final MP3 Files
- In Audacity: Select the audio you want to export. Select File>Export Selected Audio. Ensure the file type is set to MP3 Files and the bit rate mode is constant at 192 kbps, and force export to mono.
Review Your Audio Files
Before submitting your files to Author’s Republic, take time to ensure they are distribution-ready. Each audio file must meet the requirements of our retailer partners:
- Consistent in overall sound and formatting
- Free of extraneous sounds such as plosives, mic pops, mouse clicks, excessive mouth noise, and outtakes
- Comprised of all mono files or all stereo files
- Include opening and closing credits (in separate tracks)
- Contain only one chapter or section
- No longer than 119 minutes
- Contain a section or chapter announcement at the beginning of the audio file
- Include 1 to 5 seconds of silence at the beginning and the end of each track
- Measure between -23dB and -18dB RMS
- Peak values no higher than -3dB
- Noise floor no higher than -60dB RMS
- Bit rate of 192 kbps
- MP3 file format
- 44.1 kHz (44100Hz)
- No larger than 170MB
While all of this may seem like a lot, it is a key step for successful self-narrated audiobooks. Some of it simply comes down to ensuring your export settings are correct. For more help with audio editing, check out our video tutorials.
Submit Your Audiobook
Congrats! You now know how to record an audiobook. Now that you’ve reached the finish line, it’s time to get your audiobook published. Create a free Author’s Republic account (if you haven’t already) and upload your MP3 files for review. You can also run an Audio Track Validation Report to ensure your files meet all of the necessary requirements.
Not ready to take on audiobook narration yourself?
If all of this seems a bit too much, don’t worry! Choose from two straightforward audiobook production options at Author’s Republic:
- The Author's Republic Studio: With this option, you get the best of both worlds – hire a professional audiobook narrator, and manage the audiobook production yourself.
- Managed Production: This done-for-you solution takes care of everything, from selecting a narrator to delivering the final, production-ready audio files. Our professional production managers handle it all!
Record Your Own Audiobook Today!
Note: The Audacity instructions in this blog post are based on version 3.2.4. The steps shown in the accompanying YouTube videos refer to an earlier version of the software.
Editor’s Note: This post was originally written on February 9, 2023. It has been substantially revised as of October 23, 2025.